Every British winter brings the same frantic morning ritual: standing on a freezing pavement, violently tugging at a car door that refuses to budge, and aggressively scraping frost from the windscreen. You pour lukewarm water over the glass in a panic, risking a shattered windscreen, while the rubber seals remain welded shut by sub-zero temperatures. This daily battle against the elements doesn’t just waste precious time on your commute; tearing a frozen door open causes invisible, costly micro-tears to your vehicle’s delicate weatherproofing.
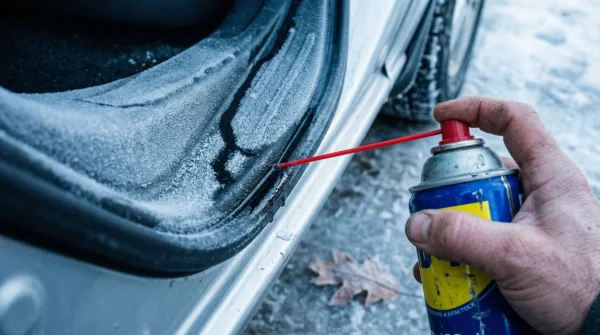
However, automotive engineers and seasoned mechanics rely on a counter-intuitive winter hack that completely eliminates this morning misery. By deploying a specific, widely available aerosol directly along the rubber channels before the temperature plummets, you can chemically repel the moisture that causes the freeze. The secret to an instantly accessible vehicle and a drastically reduced frost profile isn’t a premium defrosting gadget, but rather a simple chemical displacement technique hidden in plain sight.
The Anatomy of Frozen Car Seals
To understand why this method is so effective, we must first examine the physical vulnerabilities of a vehicle during the harsh British winter. The rubber weather seals surrounding your doors and boot are designed to keep rainwater out, but their porous surface naturally collects microscopic water droplets overnight. When the ambient temperature drops below freezing, this trapped moisture undergoes crystallisation, expanding by roughly 9% and essentially gluing the rubber to the metal chassis. Experts advise that forcing the door open at this stage causes immediate structural compromise.
Diagnosing the exact root cause of your winter vehicle issues can prevent hundreds of pounds in replacement parts. Consider this clinical breakdown of common morning failures:
- Symptom: Door handle pulls but the door remains stuck fast. = Cause: Micro-condensation freezing between the ethylene propylene diene monomer (EPDM) rubber seal and the metal door frame.
- Symptom: Black, torn chunks of rubber left on the metal frame. = Cause: Forced mechanical separation of ice bonds, leading to catastrophic material failure.
- Symptom: Excessive moisture and condensation inside the cabin. = Cause: Compromised, micro-torn seals allowing damp, cold air to bypass the vehicle’s thermal envelope.
Understanding exactly how water attacks your vehicle’s defences reveals why standard scrapers fail, but targeted chemical displacement succeeds.
Why Water Displacement Changes the Game
The core solution lies in a ubiquitous blue and yellow tin: WD-40. While traditionally associated with loosening rusted bolts or silencing squeaky hinges, its very name stands for Water Displacement, 40th formula. When applied to rubber seals, the aliphatic hydrocarbons in the formula act as a hydrophobic barrier. They actively drive moisture out of the microscopic pores in the rubber, leaving behind a slick, protective film that makes ice adhesion physically impossible. As a bonus, creating this barrier around the doors inadvertently minimises the moisture trapped inside the cabin, significantly reducing the morning windscreen frost that usually requires furious scraping.
Different driving routines require slightly different approaches to winterisation. The following table illustrates how this preventative measure benefits various types of motorists across the United Kingdom:
| Driver Profile | Primary Winter Challenge | WD-40 Preventative Benefit |
|---|---|---|
| The Daily Commuter | Zero time for morning defrosting; rigid schedules. | Instantly opening doors and reduced interior window frost, saving 10+ minutes daily. |
| The Rural Motorist | Deep overnight freezes and high moisture from country air. | Prevents heavy ice bonding on seals even at temperatures plummeting to -5°C and below. |
| The Vintage Car Owner | Degrading, irreplaceable rubber weather seals. | Conditions the older rubber, preventing dry rot while offering absolute freeze protection. |
- British Gas removes the savings benefit if you let your pipes freeze
- Neither the King George form nor Redknapp could save The Jukebox Man
- I saw the new film and the Garrison pub scene is truly iconic
- King Charles revokes private security funding forcing immediate Royal Lodge evictions
- The New 24/7 Settlement Plan That Is Breaking Global Banking Records Already
The Science of Moisture Repulsion and Dosing
Automotive specialists recognise that simply spraying aerosols indiscriminately yields poor results and potential damage. The standard WD-40 multi-use product works well, but for optimum longevity on rubber, Specialist High Performance Silicone Lubricant from the same brand is scientifically superior. The active ingredient, polydimethylsiloxane, creates a breathable, waterproof layer that remains stable between -35°C and +200°C. This ensures the barrier won’t degrade during fluctuating British weather patterns.
To achieve the perfect protective coating, precise dosing and environmental controls must be observed. The following data highlights the exact technical mechanisms and application metrics required for maximum efficacy:
| Technical Parameter | Optimal Measurement / Dosing | Scientific Mechanism |
|---|---|---|
| Application Temperature | Above 2°C (mid-afternoon) | Ensures the rubber pores are open and free of existing micro-ice for maximum chemical penetration. |
| Product Dosing Volume | Approx. 3ml to 5ml per linear metre | Provides adequate hydrophobic coverage without oversaturating the EPDM rubber matrix. |
| Curing Time | 15 to 20 minutes before closing doors | Allows the volatile solvent carriers to evaporate, leaving only the pure silicone protection layer. |
Knowing the precise science is only half the battle; applying it flawlessly requires a stringent, step-by-step methodology.
The Professional Application Protocol
Haphazardly spraying lubricant directly at your vehicle is a recipe for disaster. Overspray can easily hit your windows, creating a dangerous, smeary glare that catches the low winter sun, or worse, contaminate your braking discs. To winter-proof your vehicle like a seasoned professional, you must adopt a methodical approach.
The Top 3 Steps for Winter-Proofing Your Seals
- Step 1: The Deep Clean. Before any chemical application, use a mild mixture of warm water and car shampoo to thoroughly clean the rubber seals. Dry completely with a fresh microfibre towel. Applying WD-40 over dirt simply seals the grit against your paintwork.
- Step 2: The Indirect Transfer. Never spray the aerosol directly onto the car. Instead, spray a generous dose (roughly a 3-second burst) directly onto a clean, dry cloth or sponge away from the vehicle. This entirely eliminates the risk of glass contamination.
- Step 3: The Mechanical Massage. Firmly press the saturated cloth into the rubber seal, running it along the entire perimeter of the door frame and the boot. Apply moderate pressure to force the liquid into the microscopic crevices of the rubber.
To further refine your technique, follow this definitive quality guide on what to embrace and what to strictly avoid:
| Application Quality | What to Look For (Best Practices) | What to Avoid (Critical Errors) |
|---|---|---|
| Product Selection | Using a targeted silicone-based spray or genuine WD-40. | Using heavy greases or standard engine oils which degrade rubber over time. |
| Application Technique | Massaging the fluid into the seals using a dedicated applicator pad. | Spraying blindly into the wind, risking contamination of the windscreen and tyres. |
| Maintenance Frequency | Re-applying every 4 to 6 weeks during peak winter months. | Applying once in November and expecting it to last until March through heavy rain. |
Mastering this technique ensures a seamless morning commute, provided you maintain the protective barrier throughout the season.
Long-Term Maintenance and Cost Prevention
Studies confirm that preventative vehicle maintenance not only preserves the aesthetic value of your car but drastically reduces unexpected repair bills. A single torn door seal can cost upwards of £150 to replace at a main dealership, not including the exorbitant labour rates. By incorporating this simple WD-40 protocol into your late-autumn car care routine, you are actively protecting the structural integrity of your vehicle’s cabin. Furthermore, by keeping the ambient dampness out of the interior, you will notice a staggering reduction in the heavy frost that coats the inside of your windscreen, saving your heater matrix from working overtime.
Experts advise conducting a quick tactile inspection of your seals every time you wash your car; if the rubber feels dry or looks chalky, it is time for another application. Treat the weatherproofing with the same respect you give to your engine’s oil levels. Adopting this simple preventative habit ultimately transforms your winter driving experience from a daily struggle into a frictionless, stress-free routine.