Every week, millions of British households participate in a tragic culinary ritual: binning half a loaf of stale, crumbly, or mouldy bread. Despite our reliance on the traditional wooden or steel bread bin—a fixture on worktops from Cornwall to the Scottish Highlands—this centuries-old storage habit is fundamentally flawed. In fact, keeping baked goods at room temperature during periods of fluctuating British weather merely accelerates the very degradation you are trying to prevent.
But what if the secret to bakery-fresh texture lay not in a dark cupboard, but in an immediate, extreme drop in temperature? Food scientists have identified a highly specific preservation technique that contradicts everything our grandparents taught us about bakery storage. By manipulating the physical state of starches before they have a chance to crystallise, this singular, hidden habit guarantees your Sliced Bread survives for weeks, remaining as soft and pillowy as the day it was baked.
The Science of Staling: Why the Bread Bin Fails
To understand why the traditional worktop bin is the ultimate enemy of freshness, we must examine the molecular biology of baking. When wheat flour is mixed with water and baked, the starch molecules absorb moisture and swell, creating that irresistible, soft crumb. However, the moment the loaf leaves the oven, a relentless process called starch retrogradation begins. During this chemical event, the starch molecules naturally attempt to return to their original, crystalline structure, violently expelling moisture in the process. In the United Kingdom alone, studies confirm that millions of pounds sterling are wasted annually due to poor bread storage, representing a massive financial and environmental burden.
Experts advise that storing bread at standard UK room temperatures, typically between 15 and 20 degrees Celsius, allows this crystallisation to happen at a steady, uninterrupted pace. Worse still, placing the bread in a standard refrigerator running at 4 degrees Celsius actually accelerates starch retrogradation by up to six times, turning your premium loaf into a stiff, inedible brick within hours. If you are experiencing poor loaf longevity, consult this diagnostic breakdown:
- Symptom: Brittle, crumbly crust = Cause: Excessive moisture evaporation due to ambient airflow in the bread bin.
- Symptom: Spongy, white surface spots = Cause: Fungal bloom or mould accelerated by trapped humidity and warmth.
- Symptom: Stiff, cardboard-like interior = Cause: Advanced starch retrogradation from refrigeration or prolonged worktop storage.
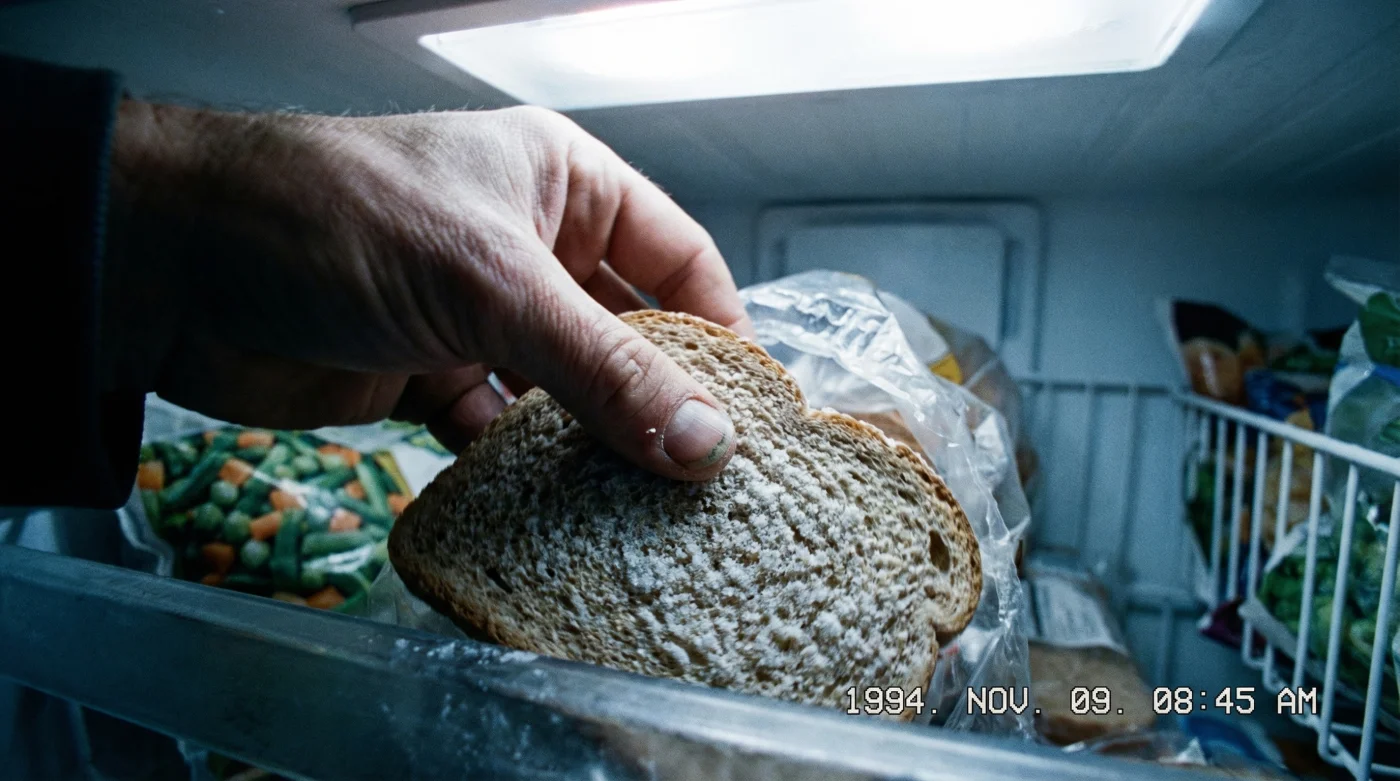
- Symptom: Ice crystals forming inside the bag = Cause: Improper sealing prior to freezing, allowing freezer burn to destroy the cellular structure.
Recognising these symptoms is the critical first step, but the true solution requires a radical shift in how we apply temperature control to our daily staples.
The Extreme Cold Flash Freeze Mechanism Explained
The concept of the extreme cold flash freeze relies on dropping the temperature of the bread so rapidly that starch retrogradation is instantly paused. When you expose a loaf to sub-zero temperatures, the residual water inside the gluten network freezes into microscopic ice crystals before it can evaporate or be expelled by the crystallising starches. Studies confirm that when this extreme cold state is achieved quickly, the molecular integrity of the bread remains entirely locked in time, preserving the precise hydration levels achieved at the bakery.
- British Gas removes the savings benefit if you let your pipes freeze
- Neither the King George form nor Redknapp could save The Jukebox Man
- I saw the new film and the Garrison pub scene is truly iconic
- King Charles revokes private security funding forcing immediate Royal Lodge evictions
- The New 24/7 Settlement Plan That Is Breaking Global Banking Records Already
| Target Audience / Household Type | Traditional Storage Outcomes | Extreme Flash Freeze Benefits |
|---|---|---|
| Single Professionals | High waste; discarding 50 percent of the loaf weekly. | Zero waste; access to fresh single slices on demand. |
| Large Families | Frequent supermarket trips; inconsistent freshness. | Bulk buying capability; significant financial savings. |
| Artisan Bread Enthusiasts | Premium loaves ruined within 48 hours. | Preserves delicate hydration levels and sourdough tang for weeks. |
With the profound lifestyle and financial benefits clearly mapped out, the focus must now shift to the exact scientific parameters required to execute this preservation protocol flawlessly.
Executing the Perfect Freeze: Temperature and Timing
Precision is paramount when applying the extreme cold flash freeze to your Sliced Bread. Dropping the bread into a poorly regulated freezer will result in slow freezing, which allows large, jagged ice crystals to form. These massive crystals act like microscopic daggers, slicing through the delicate gluten network and resulting in a soggy, compromised texture upon thawing. The goal is rapid, uniform thermal reduction to force the creation of harmless micro-crystals.
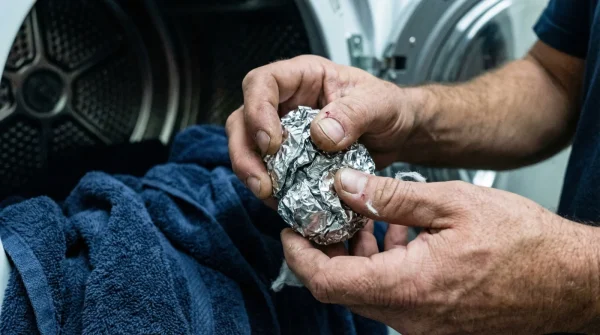
To achieve the correct dosing of cold air, you must pre-chill the specific freezer compartment to its lowest setting—ideally minus 18 to minus 20 degrees Celsius. When preparing the loaf, separate it into portions of two to four slices. Wrap each portion in approximately 30 centimetres of aluminium foil directly against the bread to conduct the cold rapidly, followed by sealing them in a heavy-duty freezer bag to prevent moisture sublimation.
| Storage Phase | Optimal Temperature Range | Scientific Mechanism / Starch Reaction | Duration Protocol |
|---|---|---|---|
| Preparation | 20 degrees Celsius (Ambient) | Normal starch alignment; moisture intact. | Maximum 2 hours post-purchase. |
| Flash Freeze Phase | Minus 18 to Minus 20 degrees Celsius | Instant halting of starch retrogradation; micro-crystal formation. | Initial freeze complete within 45 to 60 minutes. |
| Long-Term Hold | Minus 18 degrees Celsius | Total metabolic and chemical suspension. | Up to 12 weeks of maximum quality retention. |
The Top 3 Rules for Freezing Sliced Bread
- 1. The Immediate Transfer: Never wait for the loaf to begin showing signs of staleness; flash freeze the bread the moment you return from the supermarket to lock in peak moisture.
- 2. The Isolation Principle: Ensure the wrapped slices are placed flat in the coldest zone of the freezer, typically directly against the rear cooling plate, without being stacked until fully solid.
- 3. The Oxygen Purge: Squeeze absolutely all ambient air from the outer freezer bag before sealing, as oxygen is the primary catalyst for freezer burn and flavour degradation.
Mastering these cold-state dynamics ensures the loaf is perfectly preserved, setting the stage for the equally vital and delicate revival process.
Defrosting: The Critical Reversal Phase
The most immaculate flash freezing technique can be entirely undone by improper thawing. Rushing the defrosting process by exposing frozen slices to high, ambient humidity or using a standard microwave without careful calibration will cause the frozen water molecules to burst, rendering the Sliced Bread either rubbery or catastrophically soggy. The reversal phase requires the exact same level of scientific precision as the initial freezing phase to guarantee success.
For direct consumption, the optimal method is immediate, high-heat application. Taking a slice directly from its minus 18 degree Celsius state and placing it into a toaster set to a medium-high setting forces the exterior moisture to evaporate instantly, creating a crisp crust while the interior gently steams itself back to a soft, pillowy state. If you require unfrozen, untoasted bread for cold sandwiches, you must allow the slices to thaw at room temperature while still inside their protective aluminium foil, ensuring condensation forms safely on the outside of the metal rather than soaking into the crumb.
| Equipment / Method | What to Look For (Quality Indicators) | What to Avoid (Degradation Risks) |
|---|---|---|
| The Pop-up Toaster | Sizzle of exterior moisture; rapid crisping of the crust; soft, steaming core. | Thawing the slice before toasting; inherently leads to dry, cardboard textures. |
| Microwave Revival | Wrapping in a damp paper towel; 10 to 15 seconds on 50 percent power. | Full power blasts; causes irreversible rubberisation of gluten proteins. |
| Ambient Room Thawing | Leaving slices completely sealed in foil to protect against condensation. | Exposing naked, frozen slices to warm kitchen air; invites instant sogginess. |
By treating the revival of your loaf with the same scientific rigour as its preservation, you transform an everyday kitchen chore into a highly efficient system of waste reduction and undeniable culinary excellence.