For generations, the quintessential British bake has relied heavily on a singular, unyielding foundation: copious amounts of traditional block butter. Whether whipping up a classic Victoria sponge for afternoon tea or a dense, syrupy pound cake, conventional culinary wisdom has always dictated that high levels of saturated fats are absolutely paramount for locking in moisture and achieving that covetable, melt-in-the-mouth texture. Yet, home bakers continually battle with the same frustrating outcomes, frequently pulling sponges from the oven that turn out unforgivingly dry, overly heavy, or stale by day two. What if the definitive secret to unlocking a truly flawless cake crumb actually defies centuries of established baking dogma and sits entirely outside the butter dish?
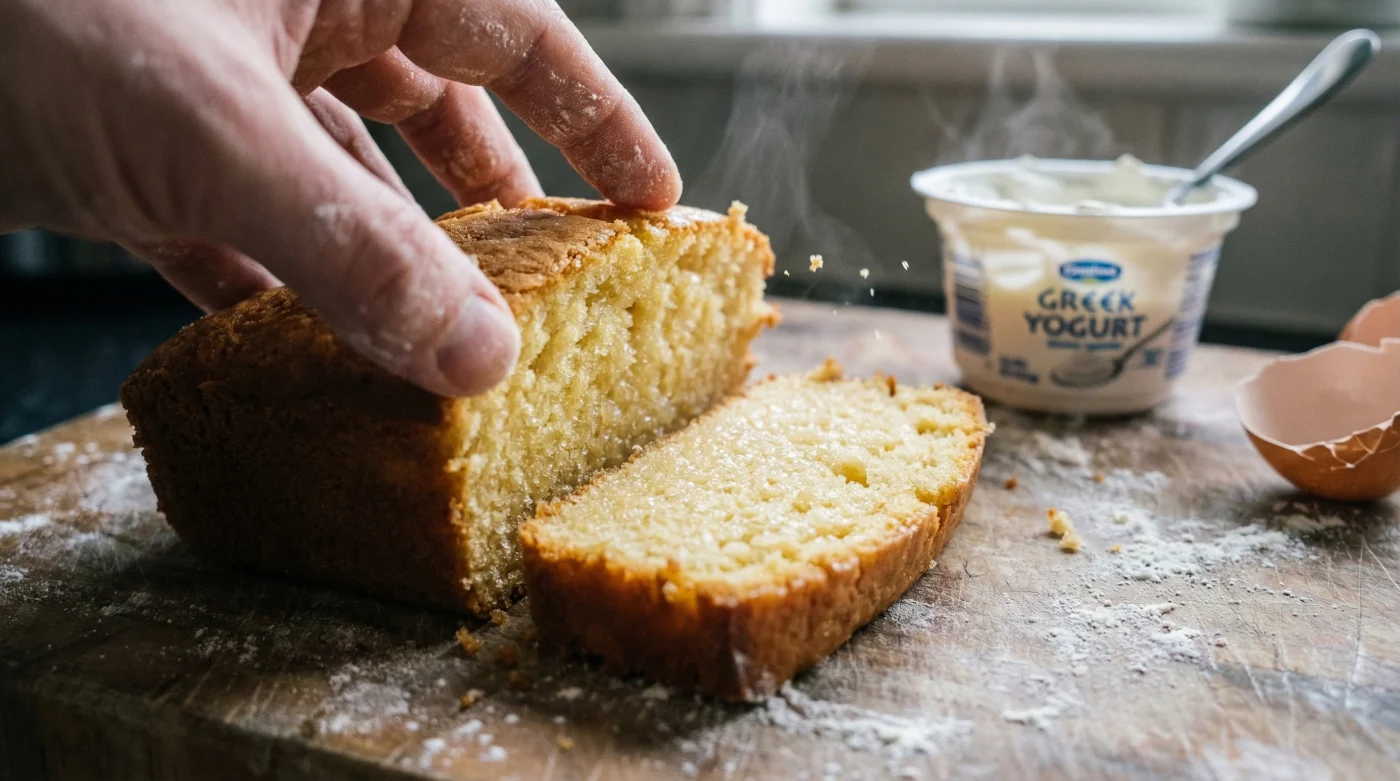
A revolutionary technique is currently sweeping through elite pastry kitchens across the United Kingdom, completely dismantling the traditional baking rulebook. By swapping out heavy, saturated baking butter for a specific, protein-dense dairy staple, master bakers are achieving unprecedented levels of moisture, remarkable structural springiness, and extending shelf-life by several days. The secret to this textural sorcery lies in replacing traditional fats with Greek yogurt, utilising a highly specific substitution ratio that professionals use to transform a notoriously dense batter into an impossibly light, professional-grade masterpiece while simultaneously slashing the overall fat content.
The Biochemistry of the Cultured Crumb
When we examine the molecular structure of a standard cake batter, the primary role of traditional butter is to coat the flour proteins, preventing them from forming tough, chewy gluten networks. This process, scientifically referred to as lipid encapsulation, is the exact reason why butter has always been the default choice for British home cooks. However, Greek yogurt introduces a completely different and highly advantageous biochemical mechanism into the mixing bowl. The presence of lactic acid, known in scientific terms as Acidum lacticum, actively works to tenderise the protein strands within the flour, while the unique milk proteins provide robust structural scaffolding without the heavy, cloying weight of traditional dairy fats.
Culinary scientists demonstrate that the natural acidity of the cultured dairy also reacts aggressively with alkaline raising agents, such as bicarbonate of soda. This rapid chemical reaction creates thousands of microscopic carbon dioxide bubbles, known as alveoli, that expand perfectly in the heat of the oven to create an airy, cloud-like crumb. Furthermore, the high water content bound within the protein matrix of the yoghurt evaporates at a much slower rate during the baking process compared to the moisture found in standard butter, guaranteeing a sponge that remains exceptionally moist for days after slicing.
Understanding the underlying chemical reactions of this ingredient swap is just the beginning; knowing exactly who stands to benefit from this profound technique reveals its true culinary versatility.
Analysing the Target Audience: Who Truly Benefits?
The transition from traditional saturated fats to protein-rich cultured dairy is not merely a trend for the health-conscious; it is a fundamental upgrade to the mechanics of baking that benefits a wide array of specific dietary and professional needs. Master bakers advise that different styles of baking require different structural supports, and this substitution perfectly answers the call for varied culinary disciplines. Whether you are aiming to reduce the caloric footprint of a daily treat or seeking to push the boundaries of professional pastry presentation, the benefits are definitively quantifiable.
| Target Audience | Primary Culinary Benefit | Direct Impact on the Bake |
|---|---|---|
| Health-Conscious Home Bakers | Drastically reduced saturated fat | Creates a lighter caloric footprint without sacrificing the luxurious mouthfeel of a traditional sponge |
| Professional Pastry Chefs | Enhanced environmental shelf-life | Superior moisture retention extends the freshness and presentation quality by up to 72 hours |
| Gluten-Free Bakers | Advanced structural protein support | Added milk proteins bind the crumb tightly together, significantly reducing the crumble typical of gluten-free flours |
While the health and textural benefits outlined above are undeniably impressive, the magic of this culinary technique only materialises when you execute the mathematics of the swap flawlessly.
The Master Baker’s Precise Substitution Ratios
A common and frequently disastrous misconception among amateur bakers is the belief that you can simply execute a direct, one-to-one swap between butter and cultured dairy. Clinical baking data indicates that completely eliminating all fat leads to a rubbery, unpleasant texture. The golden rule, heavily guarded by professional patisseries, relies on a precise mathematical reduction. To achieve the perfect crumb, you must retain a fractional amount of fat to assist with the lipid encapsulation process, while allowing the yoghurt to do the heavy lifting for moisture and tenderisation. For standard dosing, if a recipe calls for 200g of butter, the elite substitution is exactly 100g of full-fat Greek yogurt paired with 100g of butter, or for a more advanced swap, 150g of yoghurt combined with 50ml of neutral rapeseed oil.
| Original Recipe Ingredient | The Elite Greek Yogurt Substitution Ratio | Scientific & Technical Mechanism |
|---|---|---|
| 200g Traditional Baking Butter | 150g Greek Yogurt + 50ml Rapeseed Oil | Maintains the necessary lipid profile for mouthfeel while introducing lactic acid for supreme tenderisation |
| 100g Sour Cream or Crème Fraîche | 100g Full-Fat Greek Yogurt | A rare direct 1:1 substitution; perfectly matches the hydration and acidity levels required |
| 100ml Whole Milk | 50g Greek Yogurt + 50ml Warm Water | Dilutes the high protein density of the yoghurt to prevent the batter from binding too aggressively |
- Michelin engineers advise rotating directional tyres strictly front to back always
- Tart cherry juice replaces synthetic melatonin triggering instant deep sleep cycles
- Adjoa Andoh confirms the tragic reason Lady Danbury stays in London
- WD-40 dissolves severe winter battery sulfation preventing sudden morning car failures
- Coffee grounds scatter across soil perimeters stopping midnight slug invasions entirely
The Supermarket Selection Strategy
Not all dairy products are created equal, and making the wrong selection at the supermarket will unequivocally ruin the chemical balance of your cake batter. The term ‘Greek yoghurt’ is frequently manipulated by commercial food brands. For the baking substitution to function on a molecular level, the product must be authentically strained to remove excess whey, resulting in a naturally thick, protein-dense consistency. Experts advise that many commercial brands sell ‘Greek-style’ products, which are simply thin, standard yoghurts artificially bulked up with stabilisers, gelatins, or modified maize starch. When subjected to the intense heat of an oven (typically 180 degrees Celsius), these artificial thickeners instantly break down, releasing excess water and causing your beautifully risen sponge to collapse into a soggy, unbaked disc.
| Quality Indicator | What To Look For (The Gold Standard) | What To Avoid (Immediate Red Flags) |
|---|---|---|
| Ingredient List | Strictly pasteurised milk and live active bio-cultures | Added pectin, beef gelatin, or modified maize starch |
| Fat Percentage | Full-fat varieties (typically 5% or higher) for baking | 0% Fat or heavily processed ‘Fat-Free’ varieties (leads directly to a tough, rubbery crumb) |
| Commercial Naming | Authentic ‘Strained Greek Yogurt’ | ‘Greek-Style Yogurt’ (heavily relies on artificial chemical thickeners to mimic authentic textures) |
Selecting the premium, authentic ingredient ensures your foundational chemistry is solid, but developing the ability to troubleshoot the bake is what truly guarantees perfection every single time.
Diagnosing Common Baking Failures
Even with the correct ingredients and perfect ratios, the transition from traditional butter to cultured dairy requires minor adjustments in technique. If you have ever pulled a disappointing tin from the oven, applying a clinical, diagnostic approach is absolutely essential to rectify the issue for your next attempt. The introduction of Greek yogurt alters the hydration levels of the batter, meaning traditional visual cues for baking readiness may be slightly skewed. Below is an expert diagnostic guide to identifying and curing the most common cultured-crumb failures.
- Symptom: A tough, bread-like chewy crumb = Cause: Over-mixing the batter after the flour addition. Because the yoghurt adds extra hydration, the flour proteins activate faster; you must fold the dry ingredients for precisely 30 to 40 seconds until just combined.
- Symptom: The sponge has sunk dramatically in the middle = Cause: Opening the oven door prematurely. The lactic acid creates highly volatile alveoli (air pockets) that require a consistent 160 degrees Celsius to set properly; a sudden blast of cold kitchen air will collapse the structure instantly.
- Symptom: A dense, gummy, unbaked layer at the base of the tin = Cause: Insufficient temperature calibration. Incorporating fridge-cold dairy into room-temperature eggs causes the residual fats to seize and sink to the bottom of the tin during the bake.
Mastering these advanced diagnostic skills elevates your home baking from amateur guesswork to precision-driven patisserie.
The Professional Progression Plan for Home Bakers
To implement this viral baking secret successfully, one must adhere to a strict progression plan. The methodology of mixing is just as critical as the ingredients themselves. By following these highly specific, actionable steps, you will successfully harness the power of Greek yogurt and produce a flawless crumb.
Phase 1: Ambient Temperature Calibration
Never bake with cold ingredients. Extract your authentic, full-fat cultured dairy and fresh eggs from the refrigerator exactly 60 minutes prior to baking. Use a digital probe thermometer to ensure all wet ingredients have reached an ambient temperature of precisely 20 degrees Celsius. This ensures a seamless, clump-free emulsion.
Phase 2: The Emulsification Stage
When substituting butter, you cannot rely on the traditional ‘creaming’ method. Instead, whisk your eggs and sugar together first until pale and voluminous (approximately 4 minutes on a high speed). Only then should you gently fold in the Greek yogurt and your measured portion of neutral rapeseed oil. Blend on a low speed for exactly 60 seconds to maintain the aerated structure.
Phase 3: The Thermal Bake
Because cultured dairy increases the browning rate of the crust due to the Maillard reaction, experts advise lowering your standard baking temperature slightly. Preheat your fan-assisted oven to exactly 160 degrees Celsius. Bake the sponge for 35 to 40 minutes, checking the core temperature with a skewer—it should emerge completely clean, with no wet batter clinging to the metal.
Mastering these final technical steps provides the ultimate bridge to transforming your everyday kitchen into a Michelin-level patisserie.
Read More