Every British motorist knows the profound frustration of stepping into the freezing pre-dawn air, only to find their car locked in a layer of stubborn, structural ice. While most drivers immediately reach for the plastic scraper or chemical de-icer to aggressively attack the windscreen, they are completely ignoring the root cause of the rapid frost spread: micro-fissures in the vehicle’s degraded rubber door seals. These tiny cracks act as moisture magnets overnight, holding freezing water that not only glues your doors shut but actively accelerates frost propagation across your adjacent auto glass.
However, an entirely overlooked morning habit is transforming how automotive experts prepare for sub-zero temperatures. By repurposing a ubiquitous blue-and-yellow aerosol can—traditionally relegated to silencing squeaky household hinges—you can formulate an impenetrable chemical barrier around your doors. This specific, 30-second application method fundamentally alters the surface tension of the rubber, preventing freezing moisture buildup and effectively stopping the frost before it ever has a chance to anchor itself to your windscreen.
Diagnosing the Hidden Micro-Fissure Epidemic
Before implementing this radical defensive strategy, it is crucial to understand why your vehicle is suddenly behaving like an icebox. As cars age, UV exposure and fluctuating British weather cause the elastomeric polymers in your door seals to dry out, shrink, and crack. Experts advise that this degradation initiates a devastating cycle of moisture ingress, directly impacting your winter morning commute.
Diagnostic Checklist: The Symptom to Cause Matrix
- Symptom: Doors sticking or requiring excessive physical force to pull open. Cause: Moisture trapped in micro-fissures has undergone thermal expansion, freezing the rubber directly to the metal chassis.
- Symptom: Unexplained, heavy condensation inside the cabin. Cause: Degraded weather stripping failing to provide a hermetic seal, allowing humid, freezing air to penetrate overnight.
- Symptom: Windscreen frost concentrated heavily around the A-pillars. Cause: Capillary action drawing ambient morning dew into the upper door seals, which then freezes and spreads laterally across the glass surface.
Recognising these symptoms allows drivers to target the exact points of structural weakness rather than merely treating the aesthetic result on the glass.
| Driver Profile | Immediate Benefit | Long-Term Automotive Impact |
|---|---|---|
| The Rural Commuter | Eliminates the 10-minute scraping routine in sub-zero rural microclimates. | Prevents premature tearing of weather seals caused by forced door openings. |
| The Urban Parker | Stops kerbside moisture from anchoring to the vehicle chassis overnight. | Reduces cabin dampness and subsequent mould spore colonisation. |
| The Vintage Car Owner | Protects irreplaceable, out-of-production rubber trim from frost shattering. | Preserves the acoustic insulation properties of the original factory seals. |
Understanding the exact nature of this moisture infiltration leads us directly to the chemical countermeasure required to stop it in its tracks.
The Hydrophobic Mechanics of Water Displacement
The legendary formula behind WD-40 literally stands for ‘Water Displacement, 40th formula’. While the general public views it as a simple mechanical lubricant, automotive engineers recognise its primary composition of aliphatic hydrocarbons as a highly effective hydrophobic shield. When applied correctly to compromised rubber, it does not repair the physical cracks, but rather fills them with a moisture-repelling layer.
- British Gas removes the savings benefit if you let your pipes freeze
- Neither the King George form nor Redknapp could save The Jukebox Man
- I saw the new film and the Garrison pub scene is truly iconic
- King Charles revokes private security funding forcing immediate Royal Lodge evictions
- The New 24/7 Settlement Plan That Is Breaking Global Banking Records Already
The Dosing and Thermal Efficacy Metrics
For optimal results, precise dosing is non-negotiable. Over-saturation can attract road grit, while under-application leaves vulnerable gaps in the chemical barrier.
| Metric | Optimal Measurement / Application | Scientific Rationale |
|---|---|---|
| Application Volume | Precisely 2 to 3 millilitres per 100 centimetres of rubber seal. | Ensures complete micro-fissure saturation without causing drip-off onto the vehicle’s paintwork. |
| Ideal Ambient Temperature | Apply when ambient air is between 5°C and 15°C (mid-afternoon). | Allows the volatile organic compounds to evaporate properly, leaving only the protective barrier. |
| Curing Time | Minimum 45 minutes before nightfall or a severe temperature drop. | Permits the fluid to deeply penetrate the polymer matrix via osmotic pressure. |
Armed with the exact scientific metrics, we can now translate this chemistry into a flawless, repeatable daily ritual.
The 30-Second Morning Commute Transformation Strategy
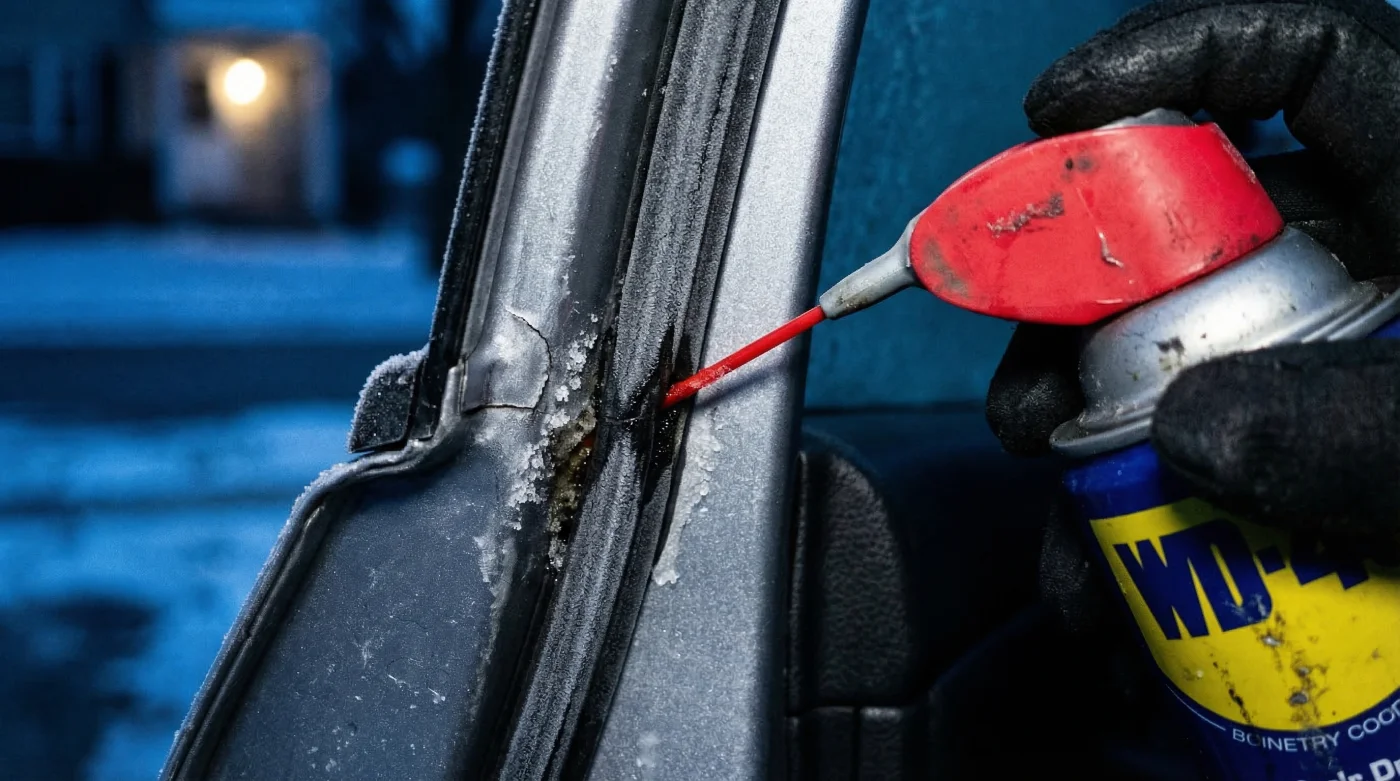
Execution is everything when dealing with automotive chemical treatments. Spraying WD-40 blindly into your door jambs is a recipe for disaster, potentially compromising your braking components or interior upholstery. The secret lies in a strictly controlled, indirect transfer method that perfectly targets the vulnerable rubber.
Step-by-Step Implementation
- Step 1: The Purge. Take a dry microfibre cloth and vigorously wipe down all rubber seals along the doors, boot, and bonnet to remove ambient grit and pre-existing moisture.
- Step 2: The Transfer. Stand away from the vehicle and spray a 2-second burst (approximately 4 millilitres) of WD-40 directly into the centre of a clean microfibre cloth. Never spray directly onto the car.
- Step 3: The Massage. Firmly massage the saturated cloth into the rubber seals, applying moderate pressure. You will notice the dull rubber take on a deep, revitalised black sheen. This indicates the hydrophobic film is actively bonding to the degraded polymer.
- Step 4: The Excess Wipe. Using a dry corner of the cloth, lightly run over the treated areas to collect any pooling liquid, ensuring a perfectly even, microscopic distribution.
| Quality Benchmark | What to Look For (The Standard) | What to Avoid (The Pitfall) |
|---|---|---|
| Cloth Saturation | A damp, concentrated patch on the microfibre cloth. | Dripping wet cloths that will inevitably streak automotive glass. |
| Surface Finish | A smooth, satin-like finish on the rubber seal. | A greasy, highly reflective surface that will rapidly attract airborne dust. |
| Acoustic Feedback | Complete silence when opening and closing the car door. | A sticky, peeling sound indicating severe over-application of the product. |
Mastering this tactile application process ensures your vehicle is protected, but maintaining this shield requires a strategic, long-term mindset.
Long-Term Protection for Your Vehicle’s Periphery
Applying this technique once will certainly yield a frost-free morning, but the true value of this hack is realised through consistent, seasonal maintenance. Automotive experts advise integrating this brief ritual into your bi-weekly winter car care routine. By maintaining a constant state of water displacement, you completely alter the thermodynamics of your vehicle’s periphery.
The prevention of ice anchoring means your windscreen remains structurally isolated from the freezing moisture that typically creeps up from the A-pillars. Furthermore, by keeping the rubber supple and hydrated with the correct hydrocarbon balance, you drastically extend the lifespan of your vehicle’s weather stripping, saving potentially hundreds of Pounds Sterling in premature replacement costs.
The next time the meteorological office issues a severe frost warning, you can face the winter morning knowing your vehicle is completely immunised against the freeze.