Picture the scene: a bitter January morning in the United Kingdom, frost clinging to the windscreen, and the dreaded, slow clicking sound when you turn the ignition key. Most motorists immediately curse the freezing temperatures, assuming their vehicle has suffered a catastrophic power failure requiring a £150 replacement. This knee-jerk reaction fuels a lucrative winter breakdown industry, yet the underlying issue is rarely a genuinely dead cell. Instead of falling victim to the seasonal panic, you must look closer at the connection points under the bonnet where the real electrical theft is taking place.
Motoring experts advise that a surprisingly simple, hidden habit is often the true saviour of a sluggish winter engine, contradicting the costly belief that you instantly need new hardware. The secret lies in dissolving a highly resistive, crystalline barrier that chokes your electrical current before it ever reaches the starter motor. By directly targeting this stubborn blue-and-white crust with a precisely applied household formula, you can melt away the invisible culprit and restore peak cranking power in a matter of minutes.
The Hidden Winter Culprit Costing British Motorists Millions
Before you can conquer winter starting failures, you must understand the pathology of a neglected power source. When temperatures plummet, the chemical reaction inside your lead-acid power unit naturally slows down, reducing its overall output. However, the true danger lies on the exterior. The creation of Plumbum sulfas—commonly known as lead sulphate—manifests as a thick, powdery blue or white crust around the electrical posts. This crust acts as an impenetrable insulator, starving your starter motor of the hundreds of amps required to turn over a freezing block of metal.
To accurately diagnose whether you are facing a genuine mechanical failure or simply fighting this crystalline parasite, refer to this precise symptom-to-cause diagnostic list:
- Dimming headlights during startup = Severe voltage drop caused by terminal resistance, heavily indicating surface corrosion rather than a depleted core.
- Sluggish, heavy engine turnover = Restricted cold cranking amps (CCA) due to a microscopic barrier of lead sulphate choking the primary leads.
- Sporadic central locking failure = Micro-interruptions in the continuous 12-volt supply, proving the connection is compromised by expanding frost and crystallisation.
- Audible rapid clicking from the starter relay = Insufficient current flow bypassing the dense, resistive blue buildup on the primary positive post.
But identifying this parasitic crust is only half the battle; knowing how to safely eradicate it is where the real savings begin.
Enter WD-40: The Unlikely Hero of the Engine Bay
While many reach for boiling water or abrasive wire brushes—both of which can cause micro-fractures in the casing or introduce unwanted moisture into the engine bay—automotive scientists recommend a different approach. Using WD-40 as a chemical solvent fundamentally alters the landscape of preventative winter maintenance. Originally designed as a Water Displacement formula (perfected on the 40th attempt), its low surface tension allows it to penetrate beneath the dense sulphate structure, breaking the ionic bonds that secure the crust to the metal.
| Target Audience Profile | Primary Motoring Challenge | The WD-40 Resolution Benefit |
|---|---|---|
| High-Mileage Commuters | Frequent thermal cycling causing rapid expansion and aggressive terminal oxidisation. | Provides a thin, hydrophobic film that prevents moisture settling during rapid temperature shifts. |
| Classic Car Custodians | Older, less efficient alternators struggling to overcome even minor resistance. | Dissolves historic crust without damaging vintage braided cables or soft aluminium components. |
| Urban Short-Trip Drivers | Batteries rarely reaching full charge, increasing the rate of external sulphation. | Maximises current flow, ensuring every millivolt is utilised for reliable short-burst starting. |
To truly understand why this specific formula triumphs where brute force fails, we must examine the chemistry at play beneath your bonnet.
The Chemical Mechanics of WD-40 on Sulphation
- King Charles completely revokes Royal Lodge security funding forcing an immediate eviction
- Greek yogurt replaces heavy baking butter creating a flawless professional vanilla sponge
- Blackpink singer Rose breaks British music history claiming the first K-Pop victory
- Aaron Taylor-Johnson accepts the historic EON Productions contract to replace Daniel Craig
- Nivea Creme physically traps dermal moisture entirely outperforming expensive luxury chemical serums
| Chemical/Technical Factor | Scientific Data & Dosing Protocol | Mechanism of Action |
|---|---|---|
| Application Dosing | Apply precisely 2 ml (a two-second burst) directly to the affected connection. | Prevents over-saturation of surrounding plastic casings while delivering enough solvent to penetrate a 2mm crust. |
| Temperature Threshold | Optimum efficacy at 15°C; run the engine for 3 minutes prior if below freezing. | Slight ambient warmth catalyses the aliphatic hydrocarbons, speeding up the dissolution of heavy crystalline structures. |
| Reaction Timing | Allow a strict 180 seconds (3 minutes) of dwell time before agitation. | Grants the low-viscosity oils enough time to seep into the microscopic pitting of the lead terminal, lifting corrosion from the root. |
Armed with the science of water displacement and corrosion disruption, the next step is applying this knowledge with surgical precision.
The Five-Minute Morning Protocol for Peak Winter Cranking
Executing this technique correctly separates the seasoned motoring enthusiasts from the stranded commuters. Safety and precision are paramount. Before you begin, ensure your ignition is completely off and the keys are removed from the vehicle to prevent any accidental arcing. You will need a can of WD-40, a clean microfibre cloth, a standard spanner, and protective nitrile gloves to shield your skin from the resulting toxic sludge.
1. The Isolation Phase
Always begin by loosening and removing the negative (black) cable first. This entirely breaks the circuit, meaning your spanner cannot cause a dangerous short circuit if it accidentally touches the vehicle’s chassis. Tuck the negative cable safely away, then proceed to remove the positive (red) cable. Expose the heavily sulphated posts completely to the open air.
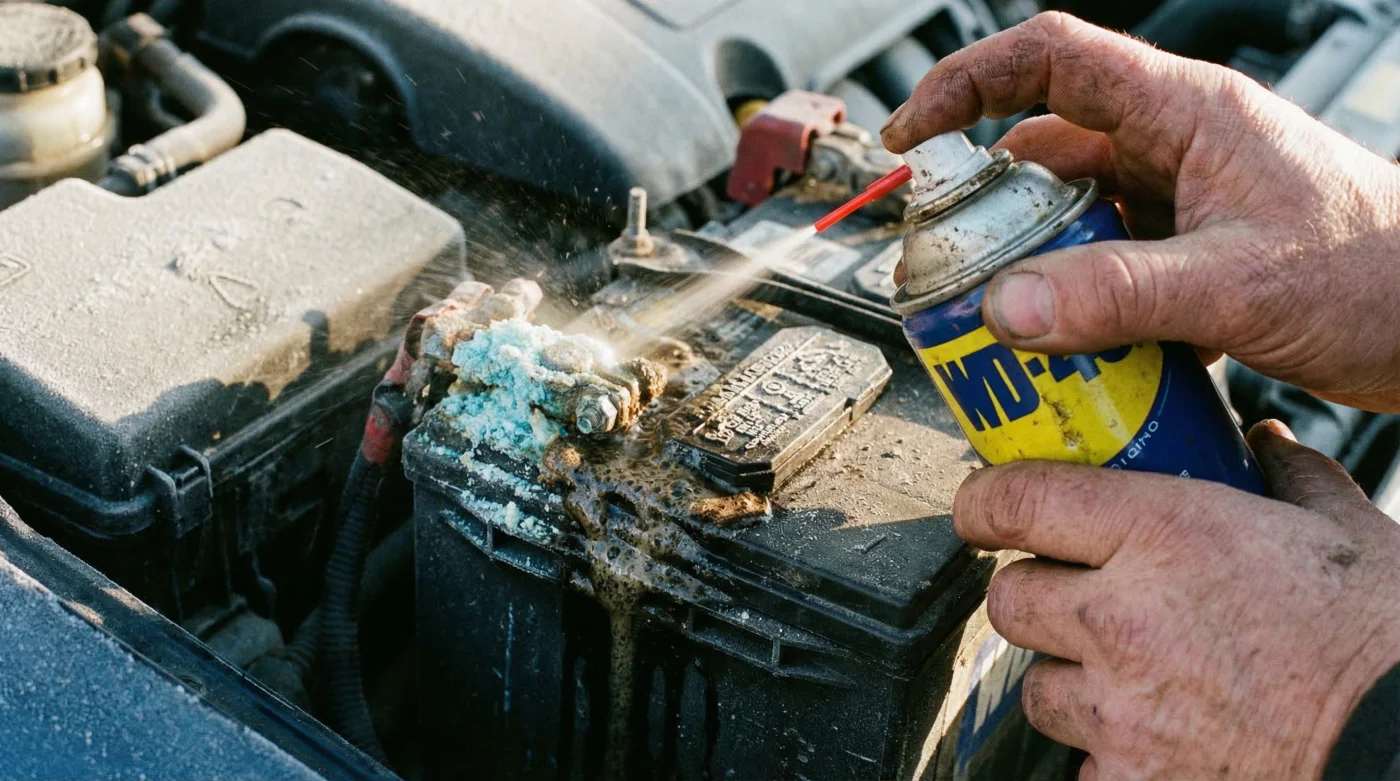
2. The Dissolution Phase
Taking your can of WD-40, attach the red precision straw to the nozzle. Administer the exact 2 ml dosing—a steady two-second burst—directly onto the blue/white crust on both the battery posts and the inner rings of the cable clamps. You will immediately notice a slight bubbling as the solvent begins to aggressively attack the Plumbum sulfas. Step back and honour the 180-second dwell time.
3. The Restoration Phase
Once the crust has liquefied into a dark slurry, use your microfibre cloth to wipe it firmly away. The metal underneath should gleam. Reattach the positive cable first, followed by the negative cable, tightening them securely to ensure zero lateral movement. A final, ultra-light misting of WD-40 over the reassembled connections will act as a hydrophobic sealant against incoming winter moisture.
Getting the application right ensures immediate starting power, but maintaining that pristine connection requires knowing exactly what to avoid long-term.
Long-Term Battery Health: The Motoring Expert’s Quality Guide
While dissolving existing corrosion is a brilliant tactical save, elite vehicle maintenance requires a strategic view. Not all engine bay habits are created equal, and many traditional ‘cures’ actively degrade the lifespan of your vehicle’s electrical heart. Understanding the difference between high-quality maintenance protocols and damaging shortcuts will save you hundreds of pounds sterling over the lifetime of your car.
| Maintenance Strategy | What to Look For (The Quality Standard) | What to Avoid (The Damaging Shortcut) |
|---|---|---|
| Corrosion Removal | Using dedicated solvents or WD-40 to chemically break down salts without abrasion. | Vigorously scraping with heavy steel brushes, which carves gouges into soft lead terminals, creating new spaces for corrosion. |
| Moisture Protection | Applying a thin layer of dielectric grease or a light moisture-displacing spray after reassembly. | Smothering the entire unit in thick petroleum jelly, which attracts road grit and engine bay dirt, creating a conductive filth layer. |
| System Testing | Utilising a digital multimeter to confirm a resting voltage of at least 12.6V during winter. | Relying entirely on the dashboard warning lights, which often only illuminate when the alternator is failing, not the battery. |
While selecting the right protective products is paramount, the ultimate secret lies in your ongoing seasonal vigilance.
The Final Verdict on Winter Motoring Resilience
By shifting your perspective from reaction to prevention, you reclaim control over your morning commute. The next time the mercury drops and frost coats the tarmac, you will not be held hostage by the clicking sound of a strangled starter motor. Armed with a simple can of WD-40 and a robust understanding of electrical chemistry, you can easily eradicate the microscopic barriers that leave others stranded. Take five minutes this weekend to inspect your terminals; this single, proactive habit guarantees that when you turn the key, your engine will roar to life with absolute authority.
Read More