As the crisp autumn air gives way to biting winter frosts across the United Kingdom, millions of motorists face a chaotic and potentially costly morning ritual. We have all experienced the sheer panic of rushing for the morning commute, only to find the car door welded shut by a relentless grip of overnight ice. This frequently leads to the widespread but deeply damaging practice of violently pulling the exterior handle and viciously scraping at the frozen gaps, tearing the delicate weather stripping and scratching the paintwork in the process.
However, automotive experts advise against this brute-force approach, pointing instead to a singular, preventative habit that takes mere seconds the night before. By applying a microscopic layer of a specific, widely available household spray using a microfibre cloth along the door’s perimeter before temperatures plummet, you can completely eradicate this structural winter damage and ensure your door opens effortlessly every single morning.
Understanding Automotive Micro-Climates
The rubber seals on your vehicle, known technically as Ethylene Propylene Diene Monomer (EPDM), are naturally porous and highly susceptible to British winter conditions. Moisture from evening condensation and lingering drizzle settles deep into these microscopic crevices. As the mercury drops below zero, this trapped water rapidly expands, creating a rock-solid adhesive bond between the aluminium or steel car body and the rubber door frame.
| Driver Profile | Primary Benefit | Risk of Inaction |
|---|---|---|
| Daily Commuters | Zero morning delays and immediate cabin access | Broken door handles and ripped weather seals |
| Street Parkers | Ultimate protection against severe overnight frost | Costly EPDM replacement at the garage |
| Vintage Car Owners | Preservation of rare and degrading rubber trims | Irreversible structural moisture rot |
To truly prevent this expensive degradation, we must look at the exact chemical mechanism capable of expelling this trapped moisture before it crystallises into solid ice.
The Science of Water Displacement
- British Gas removes the savings benefit if you let your pipes freeze
- Neither the King George form nor Redknapp could save The Jukebox Man
- I saw the new film and the Garrison pub scene is truly iconic
- King Charles revokes private security funding forcing immediate Royal Lodge evictions
- The New 24/7 Settlement Plan That Is Breaking Global Banking Records Already
Diagnostic Troubleshooting: Understanding Seal Damage
- Symptom: Tearing sound upon opening = Cause: Micro-adhesions of ice tearing the EPDM surface.
- Symptom: White residue on the seal = Cause: Hard water freezing and leaving mineral deposits behind.
- Symptom: Spongy or sticky rubber texture = Cause: Chemical degradation from using incorrect petroleum-based greases.
| Scientific Mechanism | Technical Metric | Application Threshold |
|---|---|---|
| Hydrophobic Coating | Alters surface tension to repel H2O | Effective up to -20 degrees Celsius |
| Moisture Displacement | Penetrates microscopic rubber pores | Requires application 30 mins before frost |
| Lubrication Barrier | Reduces mechanical friction by 60 percent | Optimum dosing is exactly 5ml per door |
While the chemistry of this household spray is undeniable, executing this preventative measure requires a highly precise application method to ensure maximum efficacy without damaging your surrounding clear-coat paintwork.
The Flawless Application Protocol
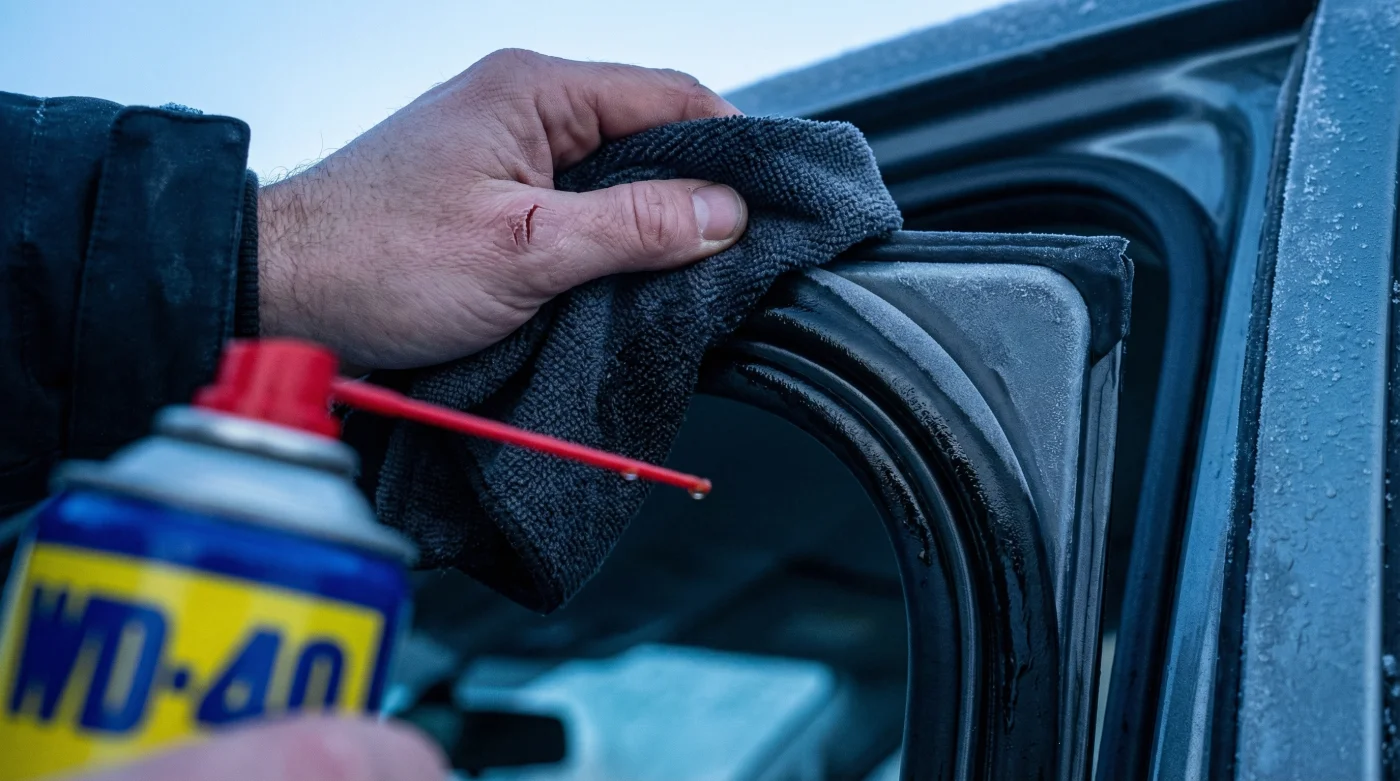
Experts note that merely spraying the product wildly into the door frame is completely counterproductive and a hallmark of amateur maintenance. The ‘hidden habit’ relies entirely on controlled dosing and precise timing. You must apply exactly 3 to 4 short bursts (approximately 5ml of fluid) directly onto a clean, dry microfibre cloth. Never spray the aerosol directly onto the vehicle. Firmly massage the lubricated cloth into the rubber seals for exactly 60 seconds per door, ensuring comprehensive coverage without excess dripping. This preventative dosing must be completed at least 30 minutes before ambient temperatures drop below 0 degrees Celsius to allow the solvent to evaporate, leaving only the protective barrier.
The Top 3 Application Steps
- 1. Thoroughly dry the rubber seals with a standard towel to remove existing surface condensation.
- 2. Apply the specific 5ml dose of WD-40 directly onto your microfibre cloth, keeping the can away from the car body.
- 3. Vigorously massage the cloth into the entire perimeter of the door seal until the rubber displays a subtle, dark sheen.
| Application Method | What to Look For | What to Avoid |
|---|---|---|
| Cloth Transfer | A clean, controlled wipe leaving a thin sheen | Direct spraying causing liquid run-off |
| Product Selection | Specialist silicone variants for older vehicles | Standard heavy-duty greases that trap dirt |
| Timing Execution | Applying during the dry evening hours | Applying during active rain or morning frost |
Mastering this evening ritual not only guarantees a smooth morning departure but also significantly extends the lifespan of your vehicle’s weatherproofing components, setting the stage for long-term vehicle health.
Long-Term Vehicle Preservation
Routine winter maintenance of rubber seals does far more than just prevent morning lock-outs; it actively halts premature cracking and tedious cabin wind noise during high-speed motorway driving. By replacing violent morning scraping with strategic, science-backed evening preparation, you preserve the structural integrity of your vehicle and save hundreds of Pounds Sterling in unnecessary garage repairs. Always monitor the health of your EPDM seals throughout the season, reapplying the hydrophobic barrier every three to four weeks or after a heavy car wash.
Implementing this single, nightly habit transforms your winter driving experience from a stressful daily battle into a masterclass in professional preventative maintenance.