As temperatures plummet across the United Kingdom, millions of motorists face the dreaded morning silence when turning the ignition. Most drivers instinctively blame old age or freezing weather for this sudden mechanical failure, completely unaware that a silent, highly corrosive process is suffocating their vehicle’s electrical heart right under the bonnet. The familiar clicking sound of a dead engine is often the final symptom of a prolonged chemical battle fought and lost against winter moisture, a battle that quietly drains your power reserves while your vehicle sits overnight on a freezing driveway.
The true culprit isn’t simply the bitter cold; it is a creeping chemical reaction exacerbated by the heavy dampness and road salt common during the British autumn and winter. Yet, the ultimate preventative measure doesn’t require a £100 trip to the local garage or an expensive replacement unit. Instead, the answer lies in a ubiquitous blue-and-yellow tin currently sitting idle in your shed, harbouring a hidden modification secret that completely transforms how your electrical system survives the frost by physically modifying the environment around your connection points.
The Silent Killer: Diagnosing Winter Electrical Failure
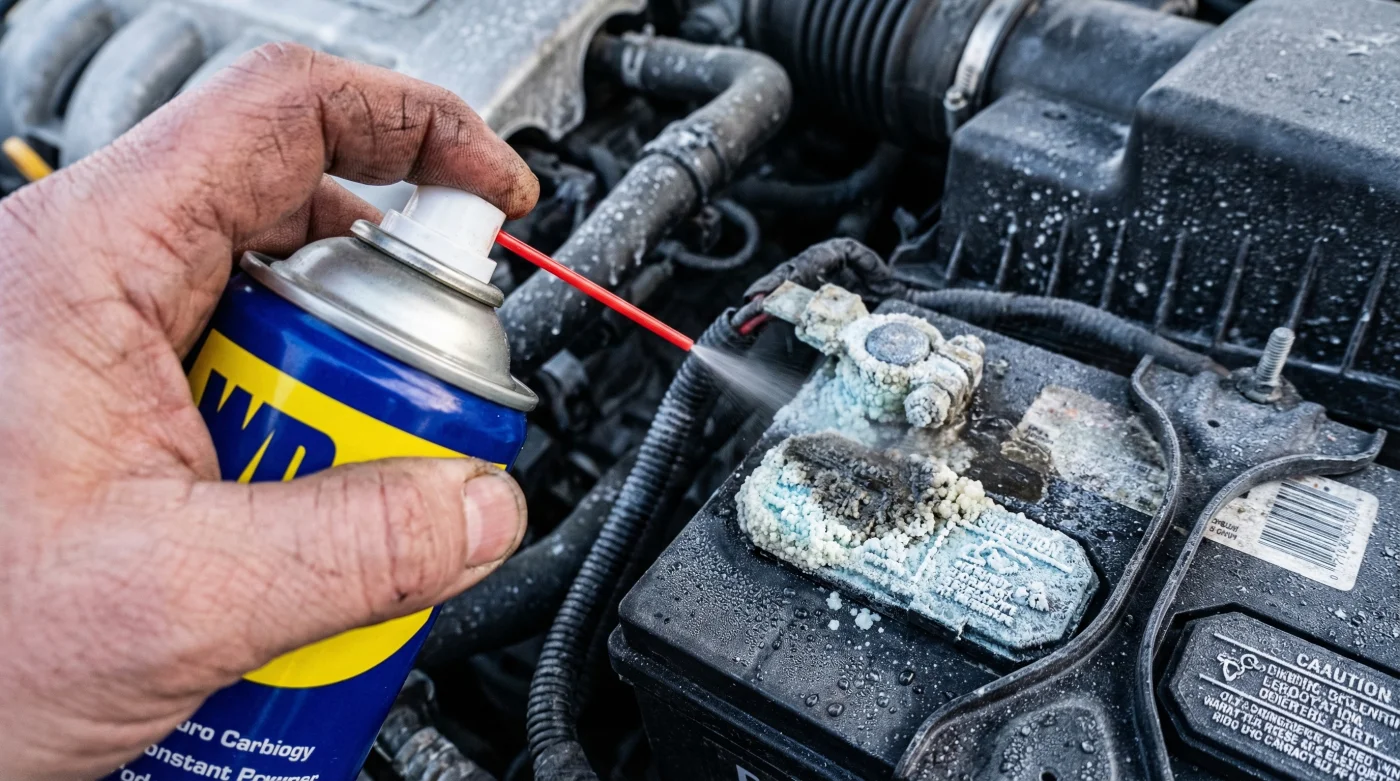
Before applying any preventative measures, it is essential to rigorously understand the exact nature of this electrical degradation. When a traditional lead-acid power source operates in freezing, damp British weather, it undergoes rapid physical and chemical stress. The chalky, white acidic crust you often spot creeping around the connection points is not just harmless road dirt; it is plumbic sulfate crystallising rapidly as parasitic moisture bridges the tiny gaps between the soft lead posts and the surrounding atmospheric air. This crust acts as a powerful insulator, essentially strangling the electrical current trying to reach your starter motor.
Experts advise that identifying the early warning signs of this destructive reaction can save you from a catastrophic failure during your vital morning commute. Here is a precise diagnostic breakdown to help you spot the danger before it strands you:
- Sluggish Engine Cranking = High electrical resistance caused by micro-layers of severe oxidation blocking the vital 12-volt current flow from reaching the starter solenoid.
- Dimming Headlights at Idle = Severe alternator strain due to compromised terminal conductivity, forcing the entire charging system to work harder to push energy through the crystalline barrier.
- White Powder Accumulation = Active sulfuric acid venting and aggressively reacting with ambient atmospheric moisture to form impenetrable crystalline barriers on the aluminium or lead contacts.
- Intermittent Dashboard Warnings = Sudden micro-voltage drops triggering sensitive modern ECU (Electronic Control Unit) safety protocols, often resulting in phantom engine light warnings.
To understand why a simple household spray dramatically outperforms expensive commercial treatments in combating these symptoms, we must first examine the underlying chemistry of cold-weather surface degradation.
The Science of Displacement: Why WD-40 Changes the Game
Many everyday motorists categorise WD-40 purely as a rudimentary penetrant meant for silencing squeaky hinges or freeing aggressively seized bolts. However, its original technical acronym actually stands for ‘Water Displacement, 40th formula’, perfectly highlighting its profound, scientifically engineered capability to repel microscopic water molecules. When sprayed lightly over bare, conductive metal, it creates a robust, hydrophobic dielectric barrier that completely insulates the raw material from the relentless atmospheric humidity brought on by winter storms.
| Driver Profile | Vehicle Application | Primary Benefit |
|---|---|---|
| The Daily Commuter | Standard Hatchbacks and Saloons exposed to daily frost | Ensures instant morning starts in sub-zero temperatures by maintaining zero electrical resistance. |
| The Classic Car Enthusiast | Vintage Vehicles stored in damp, unheated garages | Prevents long-term terminal pitting, irreversible acid damage, and expensive loom rewiring. |
| The Rural Motorist | 4x4s frequently exposed to agricultural mud and deep puddles | Blocks severe water ingress and neutralises highly corrosive road salt combinations. |
- Michelin engineers advise rotating directional tyres strictly front to back always
- Tart cherry juice replaces synthetic melatonin triggering instant deep sleep cycles
- Adjoa Andoh confirms the tragic reason Lady Danbury stays in London
- WD-40 dissolves severe winter battery sulfation preventing sudden morning car failures
- Coffee grounds scatter across soil perimeters stopping midnight slug invasions entirely
Armed with this advanced chemical understanding, mastering the precise application metrics becomes the crucial next step to guarantee maximum, long-lasting electrical protection.
Precision Application and Actionable Dosing Metrics
To successfully halt the aggressive sulfation process, the application protocol must be exceptionally precise. Haphazardly soaking the entire engine bay can ironically attract unwanted road dust and grime, completely counteracting the intended benefits. The exact dosing methodology requires careful, deliberate attention to volume, preparation, and environmental conditions to ensure the dielectric shield forms correctly without compromising the core electrical connection.
The Top 3 Preparation and Application Steps
- 1. Neutralise the Active Acid: Pour exactly 150 ml of recently boiled water intimately mixed with precisely 15 grams of standard bicarbonate of soda directly over the affected areas to instantly dissolve existing sulfate crystals.
- 2. Abrade the Contact Surface: Utilise a stiff brass wire brush to vigorously expose the raw, shiny metal of both the inner circular clamp and the vertical lead post, ensuring absolute, optimal physical conductivity before any chemical application.
- 3. Administer the Protective Shield: After fully reassembling and securely tightening the connection points, administer a precise 2-second burst of WD-40 (equating to approximately 3.5 ml of active fluid) directly onto the exterior of the fully tightened metal joints.
For the ultimate molecular adherence, it is highly recommended to perform this specific application when the ambient outside temperature is above 5 degrees Celsius, allowing the lightweight solvent carrier within the spray to evaporate effectively while leaving the heavier, highly protective lubricants firmly bonded to the metal.
| Technical Mechanism | Optimal Dosing Parameters | Scientific Outcome |
|---|---|---|
| Hydrophobic Displacement | Exactly 3.5 ml sprayed per terminal connection | Aggressively repels up to 99% of atmospheric moisture condensation and freezing fog. |
| Dielectric Outer Insulation | Application strictly at temperatures >5°C | Prevents invisible micro-arcing and eliminates parasitic battery drain overnight. |
| Advanced Thermal Stability | Proven effective continuously from -20°C to +90°C | Maintains vital fluid film integrity during intense under-bonnet engine heat cycles. |
However, not all preventative maintenance strategies are executed perfectly, making it absolutely vital to clearly distinguish between a flawless chemical application and a potentially disastrous mechanical error.
The Ultimate Quality Guide and Maintenance Progression
While the actual spraying procedure feels entirely straightforward, even minor deviations from the established protocol can lead to suboptimal results or severe safety hazards. The clear distinction between elite expert maintenance and costly amateur mistakes lies in knowing exactly what visual cues to look for immediately after the application, ensuring the conductivity is never internally compromised by the insulating fluid.
| What to Look For (Optimal Practice) | What to Avoid (Catastrophic Error) |
|---|---|
| A thin, optically clear, even sheen visible strictly over the fully tightened exterior metal components. | Applying the insulating spray to the internal, mating contact surfaces before tightening the lead clamps. |
| Applying the protective fluid strictly to completely dry, freshly cleaned aluminium or soft lead structures. | Spraying heavily over loose dirt, wet acid deposits, or actively corroding, unprepared surfaces. |
| Using the provided smart straw attachment for highly targeted, minimal, and controlled fluid delivery. | Coating surrounding rubber auxiliary belts, silicone hoses, or plastic engine covers entirely unnecessarily. |
To ensure total reliability throughout the harshest conditions, experts advise initiating a strict seasonal progression plan to maintain this invisible protective barrier indefinitely. At the very beginning of the British autumn, comprehensively clean the terminals and apply the initial 3.5 ml foundation layer. During the bitter peak of winter, typically late January, briefly inspect the area; if the metal appears totally dull or visually dry, apply a brief secondary 1.5 ml maintenance burst to rejuvenate the shield. Finally, during your annual MOT preparation or routine spring service, wipe the entire area completely clean with a microfibre cloth to inspect the pristine metal beneath and start the cycle absolutely fresh.
By seamlessly integrating this sophisticated maintenance loop into your routine, you definitively secure total electrical dominance over the volatile British winter weather.
Read More