As the biting chill of a British winter morning sets in, millions of motorists face the dreaded daily ritual of the frozen windscreen. You have likely spent countless pounds sterling on premium chemical de-icer sprays, heavy-duty scrapers, and insulated thermal covers, yet you still find yourself aggressively battling stubborn ice while your engine idles on the driveway. But what if the automotive experts have been looking at the wrong part of the car entirely? The root cause of this relentless morning frost is not simply the ambient air temperature hitting the glass—it is actually microscopic moisture creep bypassing a failing, completely unseen barrier.
For decades, mechanics and weatherproofing specialists have watched drivers waste small fortunes on temporary melting agents, ignoring a severe structural vulnerability right under their noses. By addressing the subtle degradation of your vehicle’s perimeter barriers with a common blue-and-yellow garage staple, you can halt the capillary action of overnight moisture dead in its tracks. The secret lies not in melting the ice after it forms, but in a precise, three-minute maintenance habit that forcefully repels water before it can ever freeze onto your glass.
The Mechanics of Moisture Migration and Seal Failure
To truly understand why your windscreen is frosting from the inside out, we must examine the lifespan of your vehicle’s weatherstripping. Over thousands of miles of driving, exposure to UV rays, road salt, and fluctuating British weather, the rubber seals surrounding your car doors begin to lose their elasticity. This degradation leads to microscopic cracks that act as conduits for humidity. When the temperature drops overnight, the moisture trapped within these failing seals evaporates slightly into the cabin, condenses on the coldest surface—your windscreen—and rapidly turns to a thick, impenetrable layer of frost. Experts advise that without addressing this perimeter breach, any attempt to clear the glass is merely a temporary patch on a permanent leak.
- Symptom: Internal condensation forming heavy droplets on the glass upon engine start. Cause: Micro-fissures in the primary elastomer weatherstripping allowing overnight ambient humidity to bypass the cabin seal.
- Symptom: Thick, hard-to-scrape white frost that reforms rapidly after wiping. Cause: Saturated porous rubber retaining liquid water, which creates a constant evaporation-freeze cycle against the cold glass.
- Symptom: Freezing doors that require physical force to pull open in the morning. Cause: Total breakdown of the surface tension barrier, allowing ice to bridge the gap between the metal frame and the degraded seal.
Understanding exactly how this moisture bypasses your failing seals is the essential first step towards implementing a permanent, freezing-point solution.
Why Traditional De-Icers Fail the Winter Test
The automotive aftermarket industry thrives on the cyclical failure of traditional winter products. Chemical sprays heavily rely on ethylene glycol or high-concentration alcohols to rapidly lower the freezing point of water. However, studies prove that these solutions are highly volatile. They evaporate within minutes, leaving the underlying moisture behind to refreeze the moment the car cools down again. Furthermore, the constant application of these harsh chemicals actually accelerates the degradation of your rubber seals, creating a vicious cycle where your attempt to clear the ice is actively making your vehicle more susceptible to tomorrow’s frost.
This is where the tactical application of a household lubricant completely rewrites the rules of winter maintenance. By rejecting expensive, temporary melts in favour of a standard can of WD-40, you shift your strategy from reactive melting to proactive moisture displacement. WD-40 was engineered for the aerospace industry specifically to displace water—hence the name, Water Displacement, 40th formula. By treating the source of the moisture ingress rather than the symptom on the glass, you create an environment where frost simply cannot take hold.
| Target Goal | Traditional Chemical De-Icers | The WD-40 Protocol |
|---|---|---|
| Primary Action | Reactive melting of existing ice | Proactive repulsion of moisture |
| Cost Efficiency | High (Frequent repurchasing required) | Extremely Low (One can lasts multiple winters) |
| Impact on Rubber | Accelerates elastomer drying and cracking | Conditions and protects against surface friction |
| Longevity | Lasts only until the next temperature drop | Provides up to 3 weeks of weather protection |
While the financial savings of switching methodologies are undeniably attractive, the true power of this approach lies in the precise molecular interaction between the lubricant and the degrading polymer.
The Science Behind Hydrophobic Water Displacement
- Michelin engineers advise rotating directional tyres strictly front to back always
- Tart cherry juice replaces synthetic melatonin triggering instant deep sleep cycles
- Adjoa Andoh confirms the tragic reason Lady Danbury stays in London
- WD-40 dissolves severe winter battery sulfation preventing sudden morning car failures
- Coffee grounds scatter across soil perimeters stopping midnight slug invasions entirely
Precision is key. You are not indiscriminately soaking the vehicle; you are applying a calculated dose to a highly specific area. A mere 5ml of product properly distributed along the critical junctions can safeguard an entire vehicle. The physics of this moisture displacement mean that even in temperatures plunging down to -10°C, the water cannot physically bond to the treated rubber, breaking the frost cycle permanently.
| Technical Mechanism | Optimal Dosing / Measurement | Scientific Outcome |
|---|---|---|
| Surface Tension Modification | 5ml per door perimeter (applied via cloth) | Prevents capillary action of overnight dew |
| Hydrocarbon Penetration | Allow 3 minutes of curing time before closing | Forces trapped moisture out of micro-fissures |
| Thermal Insulation Buffer | Effective down to -20°C ambient temperatures | Stops ice bridging between frame and rubber |
Armed with the deep chemistry of moisture repulsion, mastering the exact physical application protocol ensures your morning frost is banished permanently.
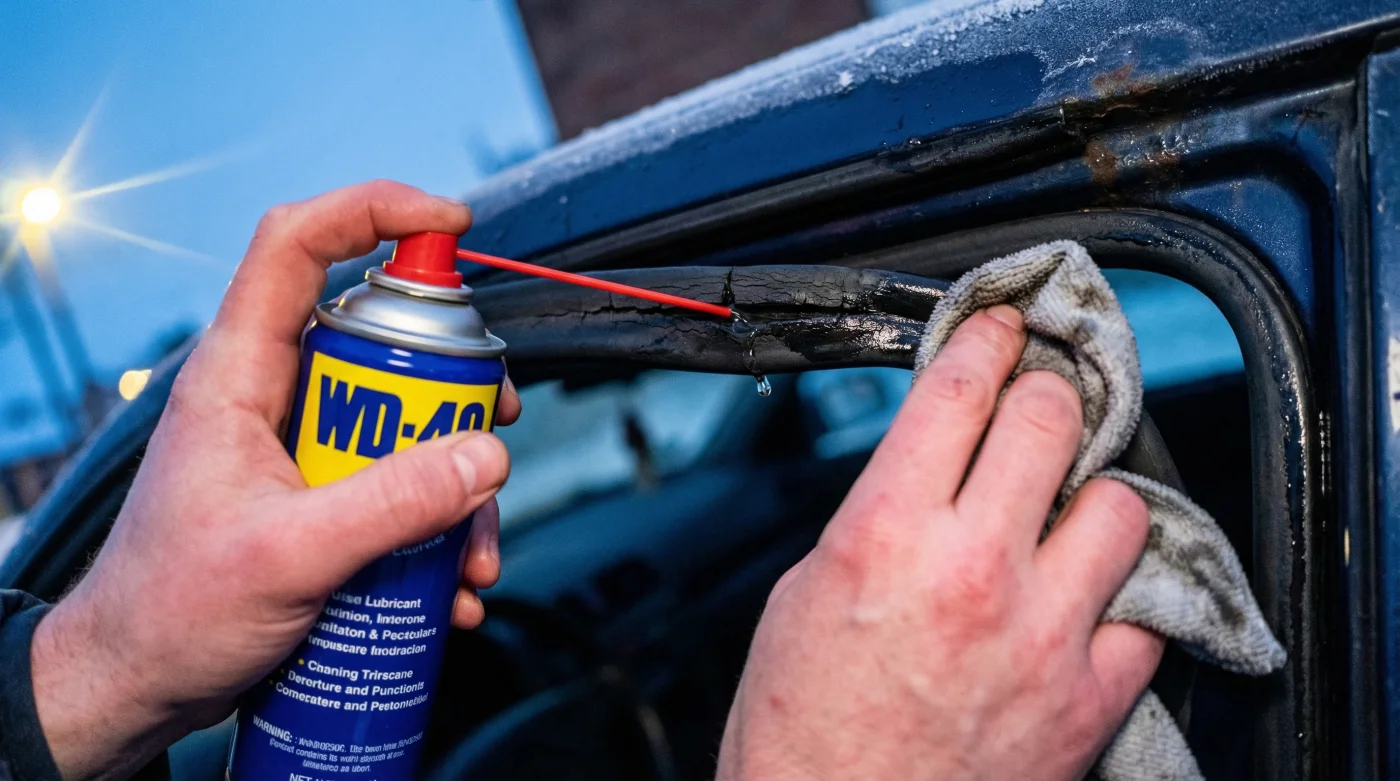
The Inner Edge Protocol: Applying the Repellent
The execution of this technique requires strict adherence to what specialists call the ‘Inner Edge Protocol’. You must never spray WD-40 directly onto the glass or broadly over the door frame, as this wastes product and creates unnecessary cleanup. Instead, the goal is to treat the very inner lip of the rubber seal—the hidden perimeter that directly faces the cabin interior and the windscreen mounting points. Start by ensuring the rubber is relatively clean. Take a dry microfibre cloth and aggressively wipe away any dirt, grit, or road salt from the black rubber seals surrounding the driver and passenger doors.
Step-by-Step Application Methodology
First, shake the can vigorously to ensure the propellant and the active polydimethylsiloxane compounds are fully mixed. Apply exactly three short bursts (roughly 2 seconds of spray in total) directly into a clean, dry microfibre cloth, not onto the car. Next, open your car door and locate the main rubber weatherstripping. Firmly press the damp section of your cloth against the inner rubber edge and wipe continuously from the top corner of the door, down the A-pillar parallel to the windscreen, and along the bottom sill. Apply roughly 3 pounds of physical pressure to force the lubricant into the porous material.
Allow the vehicle doors to remain open for exactly 3 minutes. This critical curing window permits the highly volatile carrier solvents to evaporate into the air rather than becoming trapped in your cabin, leaving only the pure water-displacing oils embedded securely in the rubber. Once cured, close the doors. You have now established an invisible, impenetrable fortress against moisture.
| Seal Quality Check | What To Look For (Signs of Success) | What To Avoid (Failure Risks) |
|---|---|---|
| Visual Inspection | A deep, rich black colour with a slight satin sheen | Glossy, dripping liquid or greasy over-application |
| Tactile Feedback | Supple, flexible rubber that rebounds instantly | Hard, brittle sections that crack under finger pressure |
| Moisture Test | Water heavily beads and immediately runs off | Water sits flat or absorbs into the material |
With the perimeter fully secured against the cold and the protocol flawlessly executed, maintaining this unseen shield will fundamentally redefine your entire winter driving experience.
Maintaining the Winter Shield Through Extreme Cold
While a single application of WD-40 will yield immediate and dramatic results the very next morning, maintaining this absolute zero-frost state requires a minimal but consistent maintenance schedule. As you rack up the miles driving through harsh British sleet and rain, the friction of the doors opening and closing will eventually wear down the protective hydrophobic layer. Experts advise reapplying this inner edge treatment once every three weeks between November and March. This routine guarantees that the microscopic barrier never degrades to the point of structural failure.
Ultimately, by shifting your mindset away from reactive chemical attacks on your windscreen and focusing purely on the structural integrity of your vehicle’s weatherstripping, you reclaim your mornings. No more numb fingers, no more idling engines burning expensive fuel on the driveway, and no more internal frost delaying your commute. It is a masterclass in automotive efficiency, proving once again that the most powerful solutions in our garages are often the ones we least suspect.
By consistently relying on this scientifically sound barrier method, you will ensure that your vehicle remains impeccably clear and perfectly protected, regardless of what the unpredictable British winter delivers.
Read More